


Modern fitness routines spend an overwhelming amount of time moving forward and backward. Running, cycling, walking, lunging, and standard squats all take place in the sagittal plane. While these compound exercises build substantial lower body power, they often leave the muscles that control side to side movement undertrained. Over time, this imbalance contributes to unstable pelvis mechanics, knees that cave inward during heavy lifts, and stubborn hip pain. Lateral band walks provide a direct, low-impact solution to that imbalance.
Often referred to as banded side steps, a glute band walk, or a banded crab walk, this exercise relies on continuous elastic resistance to recruit the stabilizers on the outside of your hips. Incorporating lateral band walks into your routine requires very little equipment, yet it delivers tremendous returns for injury prevention, athletic agility, and lower-body strength.
What Are Lateral Band Walks?
At its core, a lateral band walk is a closed chain hip abduction exercise. You position a looped resistance band around your legs, settle into an athletic quarter squat stance, and step horizontally across the floor while maintaining continuous tension.
Unlike free weights that provide a vertical gravitational load, elastic bands apply variable horizontal resistance. As you step out, tension climbs to its peak, forcing your outer hip muscles to contract forcefully to drive the movement. When you step your trailing foot inward, those same muscles must work eccentrically to prevent the band from snapping your legs shut. This controlled resistance loop exercise bridges the gap between everyday movement and balanced athletic function.
What Muscles Do Lateral Band Walks Work?
Understanding the anatomy behind banded lateral walks helps you focus your mind-muscle connection during every step. While the entire lower body plays a stabilizing role, the movement zeroes in on specific hip stabilizers that traditional squats frequently underutilize.
The Primary Movers: Gluteus Medius and Minimus
The star of this movement is the gluteus medius, a fan-shaped muscle situated on the upper, outer surface of the pelvis, supported directly underneath by the gluteus minimus. These muscles perform two critical tasks: they abduct your leg away from your body’s midline, and they keep your pelvis level whenever you bear weight on a single leg. When you execute side stepping with a band, the gluteus medius fires vigorously to push against the resistance and hold the pelvic base steady.
Synergists and Dynamic Stabilizers
Beyond the outer glute complex, several supporting muscle groups work simultaneously:
-
Tensor Fasciae Latae (TFL): This muscle sits at the front corner of your hip and works alongside the glute medius during abduction. Proper form keeps the TFL from taking over the work of the glutes.
-
Gluteus Maximus: The largest glute muscle assists in hip stabilization and provides isometric support throughout the slight squat position.
-
Quadriceps: The four muscles of the front thigh remain under sustained isometric tension to keep your knees bent and control lateral weight shifts.
-
Core Stabilizers: Your transverse abdominis and deep spinal erectors brace your pelvis to prevent your torso from swaying from side to side.
Proven Benefits of Banded Side Steps
Adding a dynamic hip warm-up like lateral resistance band walks into your regular schedule provides far more than a quick muscular burn. It addresses the biomechanical roots of several common lower-body dysfunctions.

Correcting Knee Valgus and Knock Knees
One of the most valuable benefits of mini band walks is their ability to correct knee valgus, commonly known as knock knees. During heavy squats or landing from a jump, weak hip abductors allow the femur to rotate inward, causing the knees to buckle toward each other. Lateral band walks train your glutes to actively drive the knees outward, reinforcing proper tracking over your middle toes and preventing patellar strain.
Protecting Against Runner’s Knee and IT Band Syndrome
Runners and endurance athletes frequently suffer from IT band friction syndrome and patellofemoral pain. These issues rarely originate at the knee itself; they usually stem from weak hip stabilizers that fail to control pelvic drop during the running gait. Strengthening your hip abductor muscles through banded steps relieves unnecessary friction along the lateral knee and thigh.
Overcoming Glute Amnesia
Prolonged sitting leaves gluteal muscles inhibited, a condition physical therapists often call glute amnesia. Performing a set of side band walks prior to deadlifts, barbell squats, or sprints activates dormant nerve pathways. This warm-up ensures your primary hip movers show up ready to work when lifting heavy loads.
Step-by-Step Instructions: How to Do Lateral Band Walks with Proper Form
Executing this exercise with clean mechanics is the difference between building bulletproof hips and wasting energy. Follow these steps to ensure you perform lateral band walks with proper form:
-
Band Setup: Place a mini loop band around your legs at your chosen height, typically just above your knees for beginners or around your ankles for intermediate lifters.
-
Find Your Stance: Stand with your feet hip-width apart so there is active, baseline tension on the band before you begin.
-
Engage the Athletic Position: Hinge slightly back at your hips and bend your knees into a quarter squat. Keep your chest elevated, your back flat, and your abdominal muscles firmly engaged.
-
Step Outward: Step your leading foot horizontally to the side, driving outward from your outer hip and heel. Keep your toes pointing forward rather than flaring out.
-
Recover the Trailing Foot: Slowly and deliberately step your trailing foot in the same direction, returning to your original hip-width stance. Never let your feet touch, as this causes the band to go slack.
-
Repeat the Pattern: Complete 10 to 12 controlled steps in one direction, then reverse the sequence back to your starting point so both hips work equally.
Band Placement Hierarchy: Knees vs. Ankles vs. Feet
Changing where you place your resistance loop dramatically alters joint torque, muscular activation, and overall exercise difficulty.
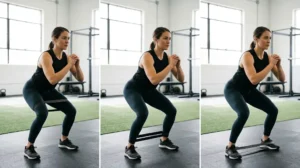
Level 1: Above the Knees
Positioning the band one to two inches above your knee joints creates a short lever arm. This setup reduces strain on the knees and hips, making it the ideal starting point for beginners, individuals recovering from joint injuries, or lifters with sensitive patellofemoral joints.
Level 2: Around the Ankles
Shifting the band down to your ankles lengthens the lever arm between the band and your hip joint. This modification noticeably increases the workload placed on the gluteus medius and tensor fasciae latae, requiring greater core stability to prevent excessive lateral torso swaying.
Level 3: Around the Forefoot
Looping the band around the balls of your feet represents the most advanced configuration. Research demonstrates that placing the band around the midfoot or forefoot creates internal rotation torque, forcing your external hip rotators and posterior glute medius fibers to work at maximum capacity while discouraging external foot flair.
Fabric vs. Latex Resistance Bands: Which Should You Use?
Choosing the right equipment makes a major difference in comfort and consistency during your lower body workouts.
-
Latex Mini Bands: Thin rubber loops are highly portable, inexpensive, and readily available in multiple resistance gradations. However, they tend to roll up on the thighs, pull on body hair, and snap unexpectedly after prolonged use.
-
Fabric Loop Bands: Wider fabric booty bands feature internal rubberized gripping strips that prevent slipping and rolling, even during aggressive lateral movements. They offer smoother, heavier resistance that holds its elasticity over time, making them the preferred choice for dedicated lower-body activation.
Lateral Band Walks vs. Monster Walks: What Is the Difference?
While many athletes use these terms interchangeably, the two movements target your hips along distinct movement pathways.
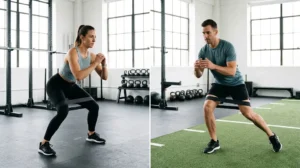
Banded crab walks require pure lateral travel along a straight horizontal path, isolating pure hip abduction in the frontal plane. Monster walks, by contrast, involve stepping diagonally forward and outward in a wide, zigzagging stride. This diagonal path combines hip abduction with hip flexion and extension, bringing the gluteus maximus and hip flexors more actively into play. Using lateral band walks alongside monster walks in your lower-body training creates complete, multi-planar hip strength.
Troubleshooting: Why Do You Feel Lateral Band Walks in Your Front Hips?
A frequent complaint among lifters is feeling the primary burn in the front of the hip or groin rather than the outer glute. This occurs when the tensor fasciae latae or anterior hip flexors dominate the movement, usually caused by pointing the toes outward like a duck.
To silence overactive hip flexors, consciously rotate your feet slightly inward so your big toes point straight ahead or very slightly pigeon-toed. Additionally, hinge back deeply into your hips, shift your weight into your heels, and lead each step with your knee rather than kicking your foot out ahead of your body.
Common Form Mistakes to Avoid
Avoiding these technical errors will keep your joints safe and ensure maximum recruitment of your target muscles:
-
Turning Toes Outward: Flaring your toes shifts mechanical tension away from the gluteus medius and dumps it directly onto the TFL and hip flexors.
-
Vertical Bouncing: Bobbing up and down between steps relies on momentum instead of sustained muscular contraction. Maintain a consistent squat depth throughout the set.
-
Letting the Band Go Slack: Bringing your feet completely together removes tension from your hips. Keep your feet at least hip-width apart at all times.
-
Trunk Swaying: Leaning your upper body heavily toward the stepping side uses torso momentum to compensate for weak hip abductors. Keep your spine upright and rigid.
How to Program Lateral Band Walks for Real Results
Depending on your overall fitness goals, structure your sets and volume according to these guidelines:
Dynamic Pre-Workout Activation
Perform 2 sets of 10 to 12 steps in each direction using a light to moderate band placed above your knees or around your ankles. Rest for 45 seconds between sets before starting squats, deadlifts, or running.
Glute Hypertrophy Finisher
Wrap a heavy fabric band around your ankles or feet at the end of a leg session. Complete 3 to 4 sets of 15 to 20 continuous steps in each direction, keeping rest intervals under 60 seconds to push the outer glutes into deep muscular fatigue.
Physical Therapy and Joint Rehab
Use a light resistance loop placed above your knees. Perform 2 to 3 sets of 8 slow steps in each direction, emphasizing a distinct two-second pause on the outward reach and a three-second eccentric return. Focus entirely on keeping your knees aligned over your middle toes.
Frequently Asked Questions
Where should you feel lateral band walks?
You should feel this movement working primarily in the upper, outer quadrant of your buttocks, which corresponds to the gluteus medius. If you feel the burn predominantly in your front hip flexors, adjust your stance to ensure your toes remain pointed straight forward.
Can lateral band walks build bigger glutes?
While lateral steps excel at muscular activation, endurance, and stability, building significant glute muscle mass requires pairing them with heavy compound movements such as hip thrusts, romanian deadlifts, and deep squats. Think of band walks as the exercise that optimizes your mechanics so you can lift heavier weights safely.
How often should you do banded side steps?
Because elastic resistance creates very little muscle damage or joint inflammation, you can safely perform this movement three to five times per week as part of your dynamic warm-up, active recovery routine, or home lower-body workout.








Leave a Reply